
Advantages of making a Windows PE flash drive
Why would you need one?
You might be thinking why can’t I just use Windows Media Creation Tool to make a Windows installation flash drive?
Well, you can, but if you are customizing the Windows image with sysprep, you will need a way to deploy the Windows image.
Using a Windows PE flash drive you can deploy the WIM file do a computer. You also have the possibility to have multiple WIM file customization on one drive that you can install unattended to any computer.
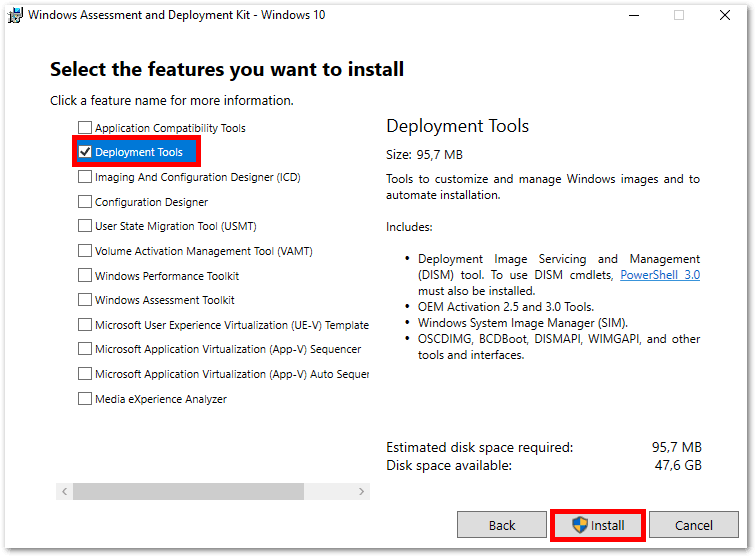
Download and install
Download “Windows Assessment and Deployment Kit (ADK)” and “WindowsPE addon kit” from here.
Install the ADK with “Deployment Tools”
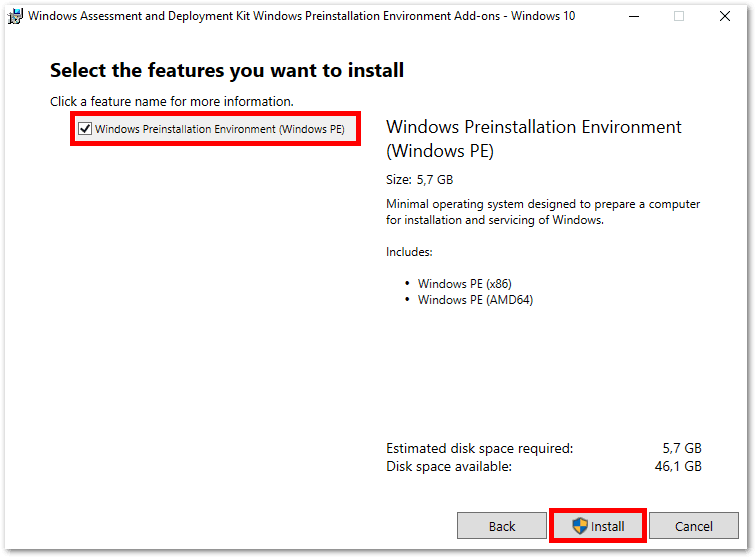
Install the “WindowsPE addon kit”, but only install this after the ADK!
Update: Seems like the WinPE add-on for the Windows ADK can be found here.
Make flash drive ready for Windows PE
Open CMD as administrator and run diskpart.
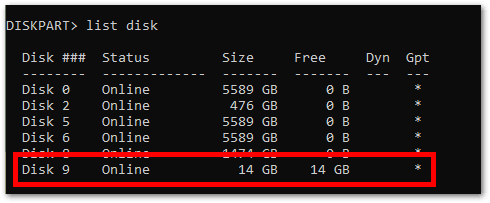
We can see that our flash disk is most probably Disk 9 because it is only 14 GB. But be extremely careful here to not select the wrong disk.
We can also see that the partition table is GPT, not MBR. We need the disk to be MBR to make a Windows PE disk.
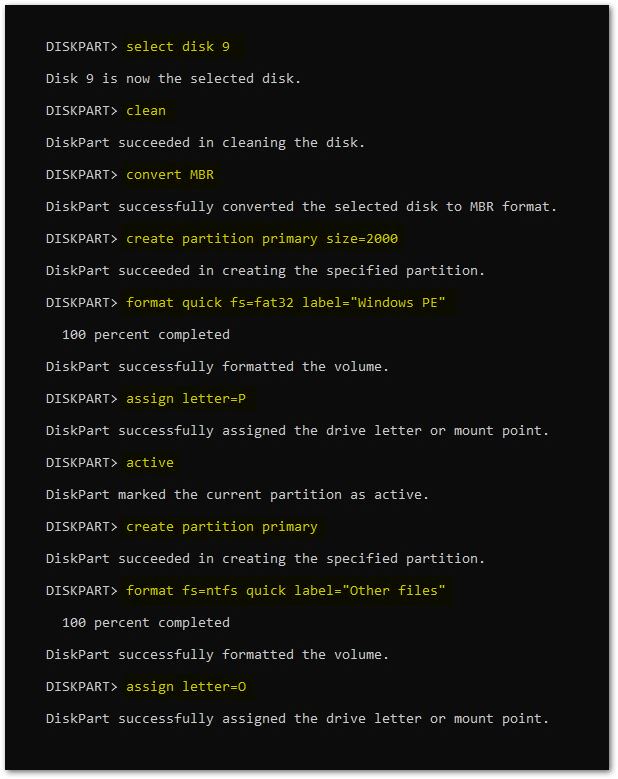
Select the disk with select disk 9 and hit enter. Then type clean and hit enter to clean the disk. Then type convert MBR and hit enter to convert the disk to MBR partition table.
Now proceed with the following commands to make two partitions on the disk P: and O:
create partition primary size=2000
format quick fs=fat32 label="Windows PE"
assign letter=P
active
create partition primary
format fs=ntfs quick label="Other files"
assign letter=O
The P: partition is where we will store our Windows PE.
Here is an illustration of what we have done so far:
Load and mount Windows PE offline
Start “Deployment and Imaging Tools Environment” in administrator mode.
Run the command to load Windows PE to the directory C:\WinPE_amd64:
copype amd64 C:\WinPE_amd64Now you have a copy of the source files. Make a folder C:\tmp and mount the Windows PE image with:
Dism /Mount-Image /ImageFile:"C:\WinPE_amd64\media\sources\boot.wim" /index:1 /MountDir:"C:\tmp"Change languages and time zone
Install your language (in this case Norwegian) with the command:
Dism /Add-Package /Image:"C:\tmp" /PackagePath:"C:\Program Files (x86)\Windows Kits\10\Assessment and Deployment Kit\Windows Preinstallation Environment\amd64\WinPE_OCs\nb-NO\lp.cab"You can now set the default languages (in this case Norwegian) with the commands:
Dism /Image:"C:\tmp" /Set-SKUIntlDefaults:nb-NO
Dism /Image:"C:\tmp" /Set-SysLocale:nb-NO
Dism /Image:"C:\tmp" /Set-UILang:nb-NO
Dism /Image:"C:\tmp" /Set-UserLocale:nb-NO
Dism /Image:"C:\tmp" /Set-InputLocale:0409:00000414
Dism /Image:"C:\tmp" /Set-AllIntl:nb-NO
Dism /Image:"C:\tmp" /Set-TimeZone:"W. Europe Standard Time"
Now you can check which language you have installed with Dism /online /Get-Intl. You might get something like:
Default system UI language : en-US
System locale : en-US
Default time zone : W. Europe Standard Time
Active keyboard(s) : 0409:00000414
Keyboard layered driver : PC/AT Enhanced Keyboard (101/102-Key)
Commit the changes
You can now commit the changes to the image with:
Dism /Unmount-Image /MountDir:"C:\tmp" /commitYou can of course discard the changes with /discard.
Write files to USB flash disk
Now write the image to your flash disk (letter P):
MakeWinPEMedia /UFD C:\WinPE_amd64 P:Boot a computer from your Windows PE disk and voilà:

Making an ISO file
If you just want to make an ISO file life is simple. Just do it like this:
MakeWinPEMedia /ISO C:\WinPE_amd64 C:\WinPE_amd64\WinPE_amd64.isoSources: