
Objective
In this guide I am making some assumptions. We have already installed Windows and spent a long time customizing it to fit our needs. Then we have made a sysprep, (meaning we have made the Windows installation ready for deployment).
Now we want to actually capture the Windows partition to a “WIM file”, so that we can deploy the customized WIM file to multiple computers later.
Warning: If you do not know what sysprep or WIM or Windows PE is, you should definitely read up on that first. If not you are going to get very confused about this process and what we are doing here.
Capturing a WIM file is fairly easy, but it is important to understand why we are doing this and in what order. For example, it would not make any sense to capture a WIM of a Windows installation that is not syspreped. That would be like making a Windows image from a Windows image…
Likewise, it would not make any sense to capture a WIM if you do not intend to use the WIM file for mass deployment. If you are just going to make a “golden” image for yourself you might as well just backup the sysprep with a backup tool of some kind.
Terminology
Windows PE – A small operating system used to install, deploy, and repair Windows 10.
WIM file – (Windows Imaging Format) in this case a copy of a Windows installation stored as a single file that we can later deploy to other computers. WIM files only capture a single partition.
Syspreped Windows disk – As explained here: Windows installations include many unique elements per installation that need to be “generalized” before capturing and deploying a disk image to multiple computers. Some of these elements include “Computer name”, “Security Identifier (SID)” and “Driver Cache”. Since you cannot deploy r clone these elements you need to “sysprep” Windows first.
A windows installation that is prepared for cloning/deployment using Sysprep tool from Microsoft. This process removes any dependencies and
Requirements
To capture a WIM file from a Windows installation you need to have “Windows PE” on a flash drive or an ISO file. I have written a separate post on how you can make a “Windows PE” disk.
You also need a flash disk or a virtual disk large enough to store the whole windows installation that you want to capture the WIM from.
This drive does not necessarily need to store both “Windows PE” and the WIM file. You can use two drives (or more) if you want, but in this example, I am going to use the same physical flash drive.
How to do it
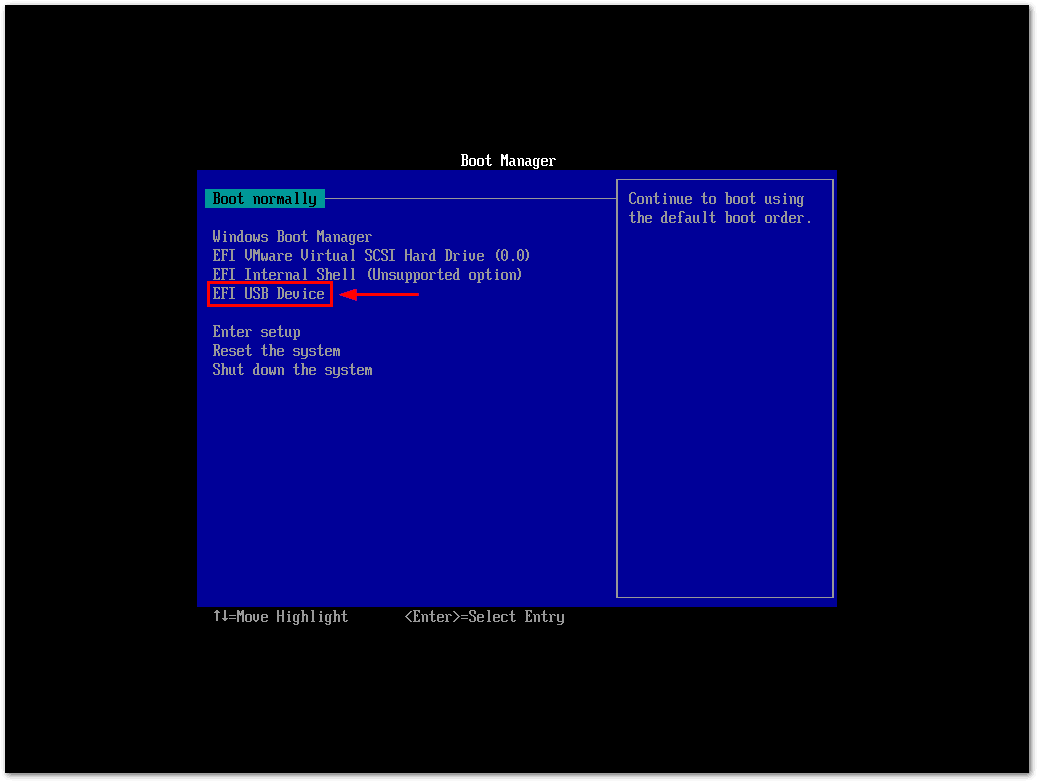
Connect your flash drive or ISO file to the computer where you have the customized, syspreped Windows.
Boot up the computer and make sure to boot directly into your “Windows PE” flash or ISO.
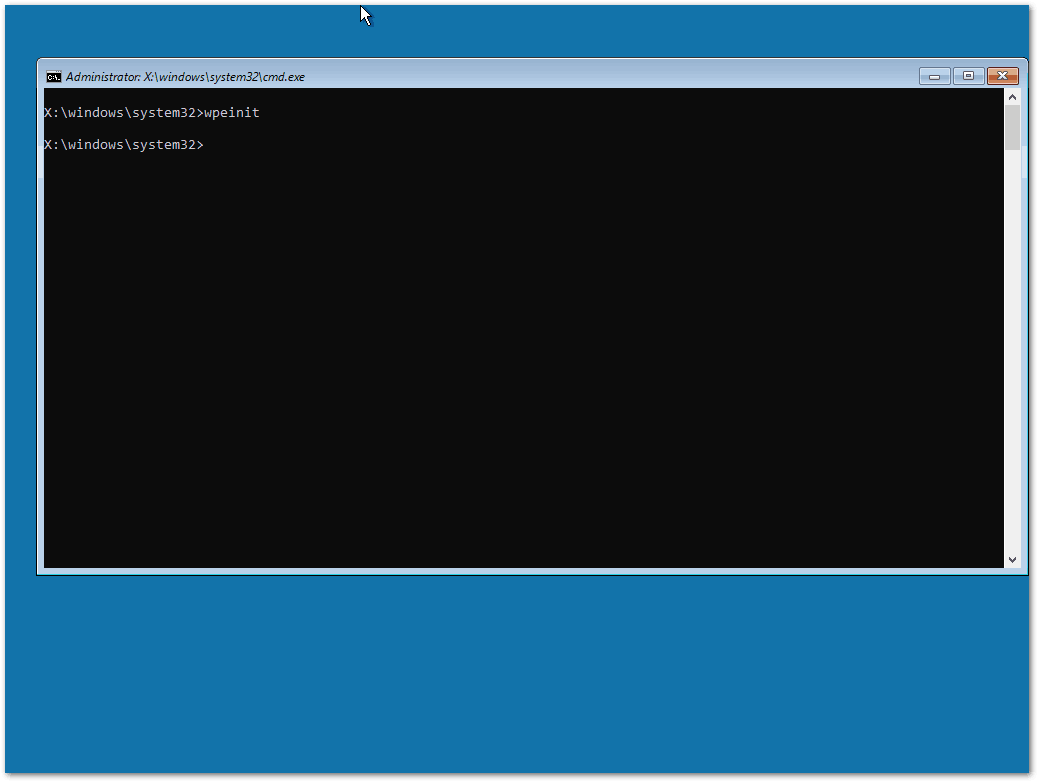
Wait for Windows PE to load. It actually loads into the RAM, so in theory (although I have not tested this) you can eject the Windows PE medium once Windows PE has loaded.

Once Windows PE has loaded up you should see a command window.
Assigning drive letters
In Windows PE, drives do not have any drive letter associated with them except for the Windows PE partition, that usually has drive letter X. So the first step in this process is to assign drive letters to each partition so that we can easily copy a WIM file from one partition to the other.
- Enter
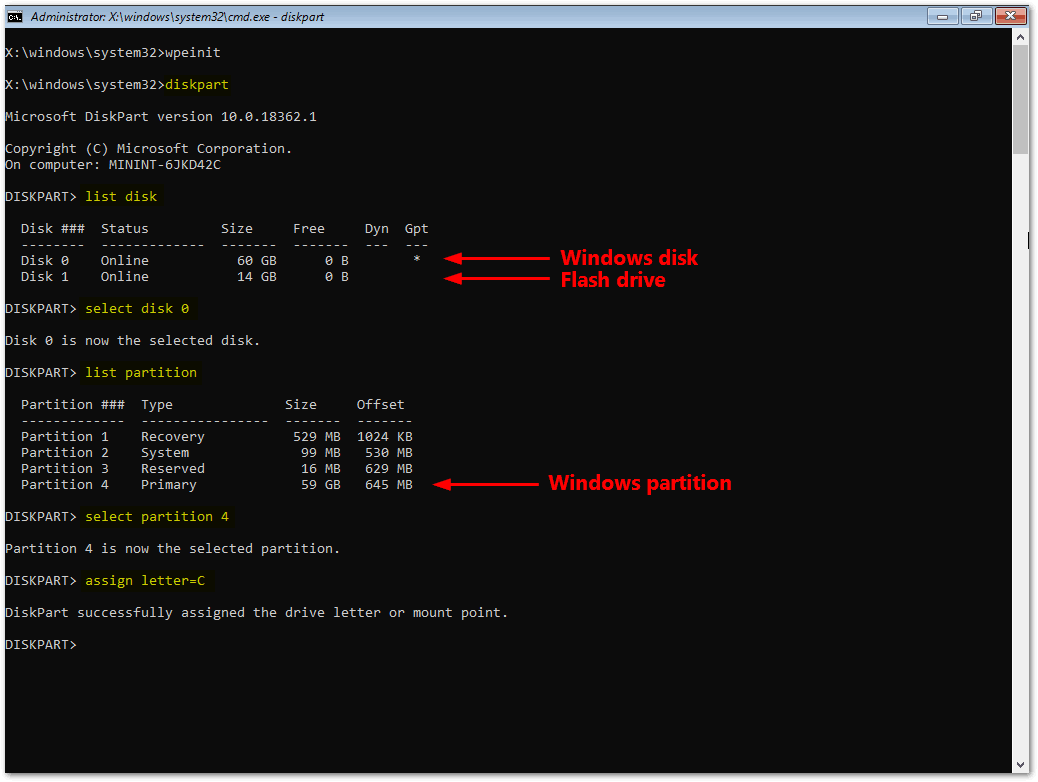
diskpartin the command line.
If you are not familiar with diskpart, it is basically just a tool in Windows we use for editing and modifying disks, partitions, and drives in Windows.
- Enter
list diskto list all the physical disks connected to the machine.
- We can see that we have two disks. Judging by the size of the disks, we can determine that disk 0 must be the disk containing the Windows image we want to capture.
- We select this disk by writing
select disk 0. - Now we enter
list partitionto see what partitions this disk contains. - We can see that there are 4 partitions. One of these must be the Windows installation. Judging by the size it must be partition 4.
- So we select partition 4 with
select partition 4. Now we can assign a drive letter to it withassign letter=C.
- Now we must add a drive letter to the partition where we want to save the WIM file.
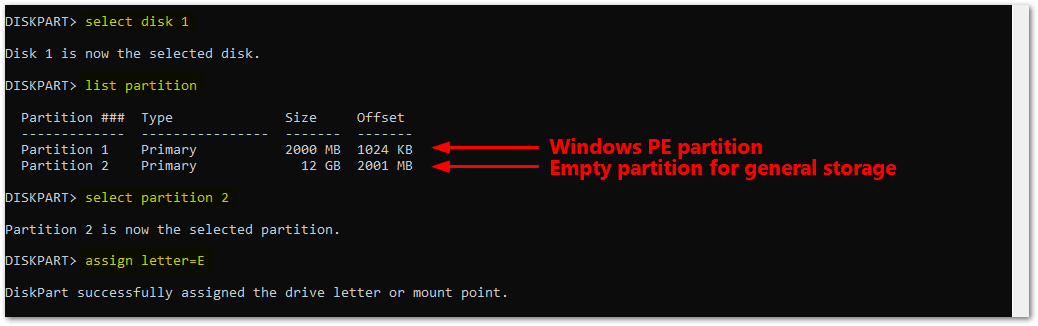
- We know that disk 1 is our flash drive. So we
select disk 1and enterlist partition.
Here we can see that we have two partitions on the flash drive. The 2000 mb partition must be our “Windows PE” and the 12 GB partition is where we want to store our WIM file. I already know this because I made these partitions beforehand.
- Enter
select partition 2to select the 12 GB partition and enterassign letter=Eto give the partition the drive letterE.
Making a WIM file
Now we have drive letter C containing the Windows installation from which we want to capture a WIM file and we have drive E in which we want to store our WIM file. But we do not have a WIM file yet.
To make the WIM file we enter the command:
Dism /Capture-Image /ImageFile:"E:\name_of_your_WIM_file.wim" /CaptureDir:C:\ /Name:name_of_your_WIM_file
What this command is saying is basically: Use DISM to capture a WIM file from drive C: and store it as E:\name_of_your_WIM_file.wim Name the WIM file name_of_your_WIM_file.
Note that this process can take a very long time. For me, it took probably about one to two hours. It depends on the speed of your flash drive and the size of your Windows installation.
If you leave the computer on overnight you might come back to a black screen because Windows PE turns itself off after 72 hours. This is by design and I do not think there is much to do about it. So you shouldn’t leave it for too long.
That’s it. Mow you can deploy the WIM file to computers with tools such as SCCM or MDT.
Sources:
Windows Imaging File Format (WIM)