
Web Scraping [web skreɪptɪŋ] – The extraction and copying of data from a website into a structured format using a computer program.
– Dictionary.com, 2019
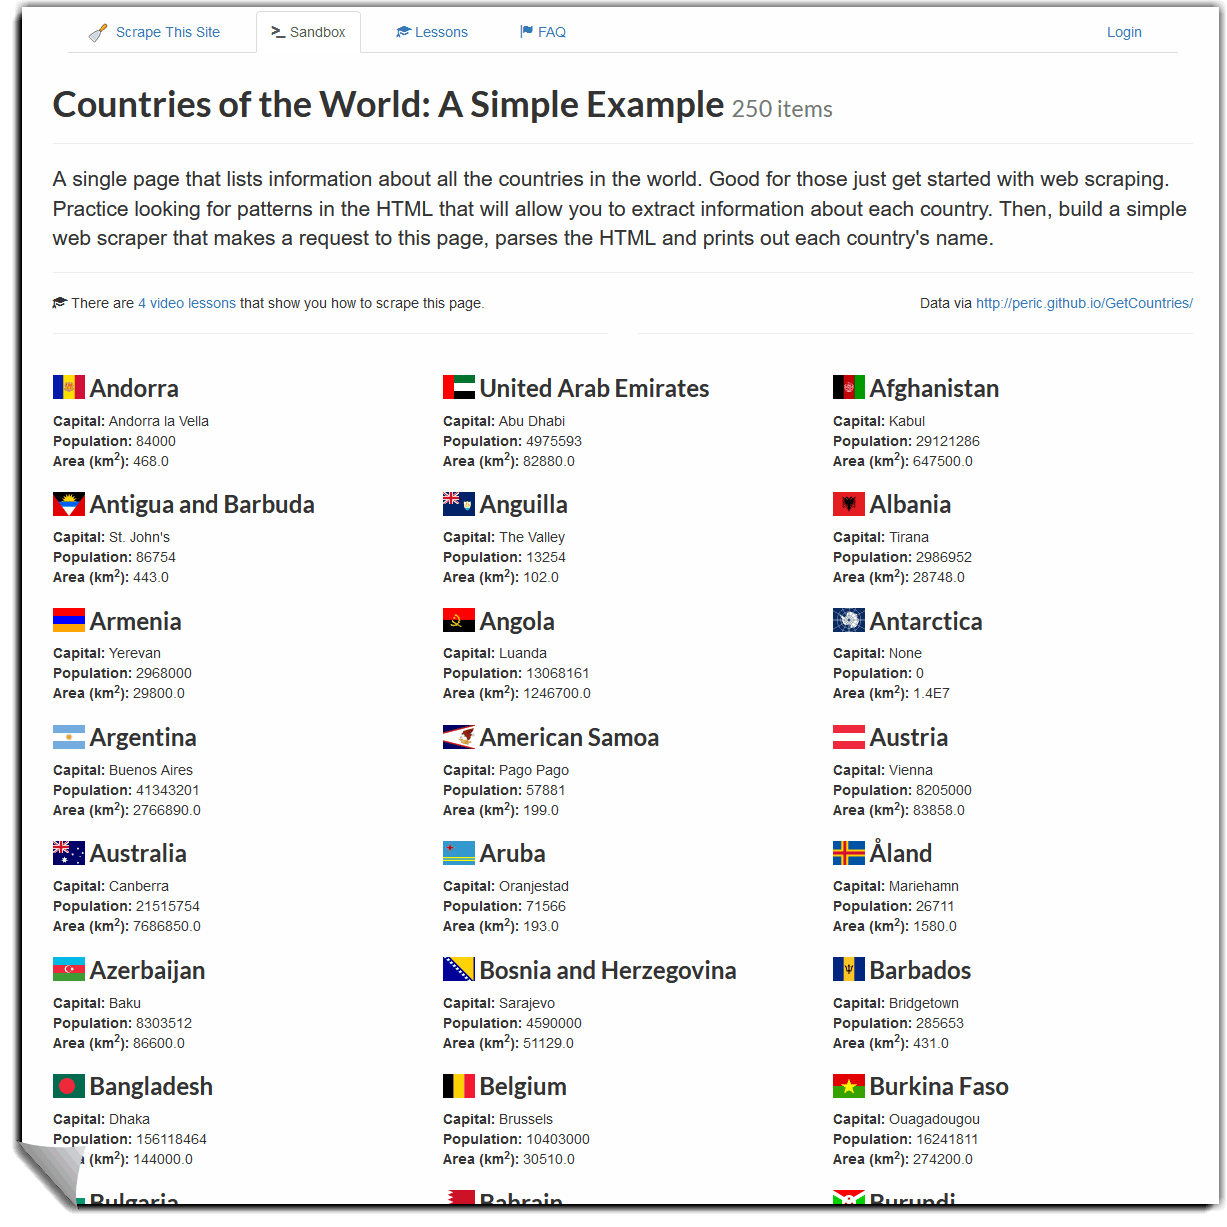
In this example, we will scrape content from the web page Scrape This Site: https://scrapethissite.com/pages/simple The site contains a list of countries in the world, their capital cities, and land area.
Note that this article is just covering non-dynamic web scraping. This is for basic HTML, not javascript, AJAX or other dynamic web pages.
If you need to scrape dynamic web pages the same principles apply, but you will need a WebDriver like for example Selenium to render the page first so that you may load the rendered HTML after.
We are using Python to do this on a Windows 10 computer, but you can use any OS supported by Python.
This article will make more sense if you have basic knowledge of HTML. For example, you should know what classes, selectors, and DIVs are and how to read HTML markup.
Installing Python for Windows 10
Python can be downloaded from https://www.python.org/downloads/windows.
We will choose “Windows x86-64 executable installer“, but we could pick any of them.
Just remember that you should pick an x64 compatible installer unless you are still living in the past and running an x86 operating system.
Make sure “Add Python 3.8 to PATH” is checked. This means that, in the command line, we can write python some_python_script.py instead of the longer more tedious way: %userprofile%/AppData/Local/Programs/Python/Python38/ some_python_script.py.

In the custom options, we will choose all options. Notice that we include “pip” here, Pythons package manager which will allow us to download and install packages from the command line.

We also want to check “Add Python to Environment variables” so that the command python is recognized in our command-line tool.

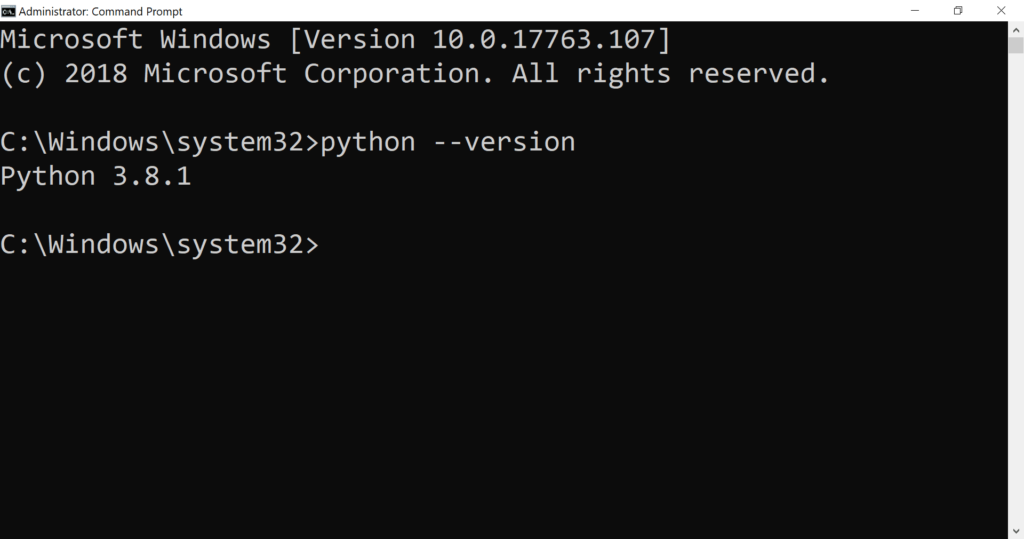
Now we can check if Python is installed by opening CMD and running the command
python --versionThis should return Python 3.8.1 or something similar.
Installing Python packages
In this example, we will use two Python libraries that are not included in the Python installer. We will have to install these using PIP (the Python package manager) .
Run CMD as Administrator and run the command:
pip install requests
pip install beautifulsoup4
If the installation is successful we should see something like Successfully installed beautifulsoup4-4.8.1 at the end of the result.
If the command fails, perhaps because “pip” was not installed we could install pip with the command:
easy_install pipAs we are installing the libraries we might get the message “You are using pip version 19.2.3, however version 19.3.1 is available“.
So why not upgrade pip to the latest?
python -m pip install --upgrade pipMaking a script file
Let’s make a Python script file on the computer desktop. Start by opening CMD and CD (change directory) to the desktop:
cd %userprofile%/desktopYou can make a file called “scraper1.py” or something, and open it directly, all in one go, with the command:
notepad scraper1.pyUsing “requests” to get web pages
Now that we have made a script file, scraper1.py we can send a request for a web page with the “request” library.
The first thing we will write in the “scraper.py” file is:
import requestsThis tells Python to import the “requests” library we just installed. “requests” provides tools to make HTTP/HTTPS requests. We will need this to download web pages.
Now we can tell Python to get a specific URL with the request library:
import requests
r = requests.get("https://scrapethissite.com/pages/simple")
As you can see, we use requests.get to get the web page and we declare this as a variable named r.
Check if the page exists
Just as a quick tip – We don’t necessarily need to get the whole HTML. We can make it easy and just check if the site actually exists by requesting an HTML status code.
In this case, we use print(r.status_code).
import requests
r = requests.get("https://scrapethissite.com/pages/simple")
print(r.status_code)
This will print out the status code. “200” means the site gives a positive response.
To make it even easier you can use print(r.ok). This will give you either True or False. Trueif the response is less than 400. Note that all status codes below 400 usually means the site exists. Everything above means there is an error.
Print HTTP headers
Another quick tip – We can get basic information like charset, encoding, and content-type by requesting the HTTP header only.
print(r.headers)Print HTML
If we want to view the HTML of the page we can print it out by using print(r.text).
import requests
r = requests.get("https://scrapethissite.com/pages/simple")
print(r.text)
Save web page as a file
We can also save the response as an HTML file. Just note that the page you request might not necessarily be an HTML file. It could, for example, be ASPX or XHTML, but we try to keep things simple here.
In Python, we need to give access to files by opening them. We can do this using the open() function. We also use the with statement to simplify the syntax.
import requests
r = requests.get("https://scrapethissite.com/pages/simple")

with open('page.html', 'wb') as f:
	f.write(r.content)
This will save the page in the same directory as your script file. wb means we will open the file in write byte mode.
We open the file as variable f and save the response from the request in the file.
Parsing HTML with Beautiful Soup 4
At this point, we have not really “parsed” any HTML. In other words: we have managed to print out all the HTML, but Python does not understand any of the HTML yet.
For HTML parsing we will use a Python library called Beautiful Soup 4.
Importing Beautiful Soup 4
Since we already used CMD to install Beautiful Soup 4 (with pip install requests beautifulsoup4), we can just import it in our script with:
from bs4 import BeautifulSoupParse HTML
Now we need to take the HTTP response and process it with BS4.
We make a variable for the processed HTML called soup and we tell BS4 to process the HTML from r.text (HTML response).
soup = BeautifulSoup(r.text, 'html.parser')Now we can print out the “soup” with print(soup) to get the processed HTML.
Here is a summary of the code:
# Import requests so we can make HTTP/HTTPS requests (get web pages)
import requests
# Import Beautiful Soup 4 for HTML parsing
from bs4 import BeautifulSoup

# Use the "get method" to get the URL with the requests library
r = requests.get("https://scrapethissite.com/pages/simple")

# Use Beautiful Soup 4 to parse the response HTML
soup = BeautifulSoup(r.text, 'html.parser')

# Print out the parsed HTML of the page
print(soup)
Find the page title
We could find something specific in the “soup”, for example, the title of the HTML page with print(soup.find('title')).
Find and DIVs with specific classes
In our example page, we have a list of countries. Each country is listed inside a DIV. For example:
<div class="col-md-4 country"></div>We can use BS4 to iterate over every DIV that has the class of country and print out the result.
Since we are looking for multiple elements, we have to use the find_all() function. This will pull a list of elements based on filters, as opposed to the find() function, which will only pull a single element based on some filters.
# Find all DIVs matching class criteria of "country" and set it as a variable
countries = soup.find_all('div', 'country')

# Print the variable
print(countries)
This will print out the HTML of all the DIVs matching the class of “country“.
To find out how many, we can also print out the number of matching elements:
print("{}".format(len(countries)))Here is the whole script so far:
# Import requests so we can make HTTP/HTTPS requests (get web pages)
import requests

# Import Beautiful Soup 4 for HTML parsing
from bs4 import BeautifulSoup

# Use the "get method" to get the URL with the requests library
r = requests.get("https://scrapethissite.com/pages/simple")

# Use Beautiful Soup 4 to parse the response HTML
soup = BeautifulSoup(r.text, 'html.parser')

# Find all DIVs matching class criteria of "country" and set it as a variable
countries = soup.find_all('div', 'country')

# Print the variable
print(countries)

# Print out number of criteria matches
print("Results: {}".format(len(countries)))
Print text only from results
If we are only interested in the text, not the HTML, we can filter out the text from the resulting HTML. In this case, we need to tell BS4 to go through the results and print out the text only.
This will require a “for-loop“.
countries = soup.find_all('div', 'country')

for text_only in countries:
	print(text_only.text.strip())
This will return all the contents of each DIV matching the criteria. For example:
Andorra
Capital: Andorra la Vella
Population: 84000
Area (km2): 468.0
But we can dig a little deeper into the HTML, Let’s say we want only the country name.
Then we can use the find() function again to find all H3 headers in the results and print them out as text.
for text_only in countries:
	print(text_only.find('h3').text.strip().encode('utf-8'))
Which will return:
Andorra
United Arab Emirates
Afghanistan
Antigua and Barbuda
and so on…
Since we are super lucky and the HTML is consistent and organized, we can also further structure the results by assigning variables to each search criteria and print it out.
countries = soup.find_all('div', 'country')

for country in countries:
	name = country.find('h3').text.strip()
	capital = country.find('span', 'country-capital').text.strip()
	population = country.find('span', 'country-population').text.strip()
	area = country.find('span', 'country-area').text.strip()
	print("{} has a capital city of {}, a population of {} and an area of {}".format(name, capital, population, area))
This will result in something like:
Andorra has a capital city of Andorra la Vella, a population of 84000 and an area of 468.0
United Arab Emirates has a capital city of Abu Dhabi, a population of 4975593 and an area of 82880.0
Afghanistan has a capital city of Kabul, a population of 29121286 and an area of 647500.0
Antigua and Barbuda has a capital city of St. John's, a population of 86754 and an area of 443.0
This is bad practice in a real scenario though. The data might not always be consistently structured. For example, if Afghanistan is missing the capital, population and area you might get results like: Afghanistan has a capital city of St. John's, a population of 86754 and an area of 443.0. Notice something wrong about this? 😜.
Storing data as CSV
It is always wise to store the fetched data in a local file as soon as possible to avoid starting over if something fails. Especially if you are scraping big amounts of data.
In this case, we will start with the full code and then explain what it does. We will skip the first part as explained above.
# Import required modules
import requests, csv

# Import BS4
from bs4 import BeautifulSoup

# Use "requests" library to get a page
r = requests.get('http://scrapethissite.com/pages/simple/')

# Set BS4 as the HTML parser
soup = BeautifulSoup(r.text, 'html.parser')

# Create a file and open it in write mode. Remove new lines after each line.
# Set encoding to utf-8-sig so the file can be opened in Excel
with open('results.csv', 'w', newline='', encoding='utf-8-sig') as f:

	# To write data to a CSV file we use the writer() function
	# We can set a custom delimiter and enable quoting for all values
	writer = csv.writer(f, delimiter=';', quoting=csv.QUOTE_ALL)

	# Writes a single row of data. In this case the header row.
	writer.writerow(["country", "capital", "population"])

	# Use a for loop to iterate over the BS4 soup results and find
	# results matching DIVs containing the CSS class country.
	# For each result let BS4 find spesific matches and get the text only and store it as variable
	for country in soup.select('.country'):
		country_name = country.find('h3', 'country-name').get_text(strip=True)
		country_capital = country.find('span', 'country-capital').get_text(strip=True)
		country_population = country.find('span', 'country-population').get_text(strip=True)

		# For each loop, write a new row in the file with these variables
		writer.writerow([country_name, country_capital, country_population])
	f.close()
The script is pulling information about 3 things: Countries, Capitals, and area (square kilometers) from the target page. We can save this in a CSV file with three columns.
This means we need to import the CSV Python module:
import CSVNext, we need to let Python make a file (with open) and open it in write mode ('w'). At the same time, we slide in some arguments to let Python know that we don’t want a new empty line for each row it creates (newline='') and that we want to save the file as UTF-8 BOM character encoding (encoding='utf-8-sig'). We need this encoding so that Excel can read foreign characters later. We then declare f as the variable for the file.
with open('results.csv', 'w', newline='', encoding='utf-8-sig') as f:As a quick tip: If you want Python to make a subfolder for the CSV file you will need to import pathlib and use the command pathlib.Path('scraped_sites').mkdir(parents=True, exist_ok=True) before the with open command.
To actually write data to the CSV file we use the writer() function. We can set a custom delimiter (delimiter=';') and enable quoting for all values (quoting=csv.QUOTE_ALL) and other options. This means the CSV file will make something like "value1";"value2"; and so on.
writer = csv.writer(f, delimiter=';', quoting=csv.QUOTE_ALL)The first row in a CSV file should contain headers for each column. We can make a header row by using writerow and add the text we want in each column with some arguments:
writer.writerow(["country", "capital", "population"])Now we must use BS4 to search for every DIV that has a class containing country. In earlier versions of BS we had to do this with soup.findAll('div', 'country'), but this is now more simple with support for CSS selectors (soup.select('.country')).
Within this search criteria, we do a deeper search, finding the country name, capital and area bu specifying their HTML/CSS markup. For example country.find('h3', 'country-name').
Of course, we don’t want HTML in our CSV file so we add .get_text(strip=True) to strip out the HTML.
Keep in mind that text indentation in Python is important. So make sure you keep the indentation in the example.
	for country in soup.select('.country'):
		country_name = country.find('h3', 'country-name').get_text(strip=True)
		country_capital = country.find('span', 'country-capital').get_text(strip=True)
		country_population = country.find('span', 'country-population').get_text(strip=True)
Now that we have declared all these search terms as variables, we can let Python write them as rows to the CSV file using writerow. Since we are using a for loop one row will be written for each iteration/search.
writer.writerow([country_name, country_capital, country_population])Finally, we make good practice by letting Python close the CSV file.
f.close()If we run this code now we will get a CSV file with content like:
"country";"capital";"population"
"Andorra";"Andorra la Vella";"84000"
"United Arab Emirates";"Abu Dhabi";"4975593"
"Afghanistan";"Kabul";"29121286"
"Antigua and Barbuda";"St. John's";"86754"
"Anguilla";"The Valley";"13254"
"Albania";"Tirana";"2986952"
"Armenia";"Yerevan";"2968000"
"Angola";"Luanda";"13068161"
"Antarctica";"None";"0"
"Argentina";"Buenos Aires";"41343201"
"American Samoa";"Pago Pago";"57881"
"Austria";"Vienna";"8205000"
"Australia";"Canberra";"21515754"
"Aruba";"Oranjestad";"71566"
"Åland";"Mariehamn";"26711"
"Azerbaijan";"Baku";"8303512"
"Bosnia and Herzegovina";"Sarajevo";"4590000"
"Barbados";"Bridgetown";"285653"
"Bangladesh";"Dhaka";"156118464"
"Belgium";"Brussels";"10403000"
"Burkina Faso";"Ouagadougou";"16241811"
"Bulgaria";"Sofia";"7148785"
"Bahrain";"Manama";"738004"
"Burundi";"Bujumbura";"9863117"
"Benin";"Porto-Novo";"9056010"
"Saint Barthélemy";"Gustavia";"8450"
"Bermuda";"Hamilton";"65365"
"Brunei";"Bandar Seri Begawan";"395027"